Developer Guide: Privacy Solution with Layer-2 Blockchain (DvP Focus)
This document details the architecture and development practices for our privacy solution built on a Layer-2 blockchain leveraging Delivery vs Payment (DvP) mechanisms. It's intended for developers integrating with our platform, focusing on key concepts, code examples, and best practices.
1. Overview & Architecture
Our solution enables secure and private cross-bank transactions within a Layer-2 environment. The core principle is to facilitate DvP – ensuring the delivery of assets (e.g., tokens) before payment is executed, minimizing risk for all parties involved.
Key Components:
- Layer 1 (L1): The underlying blockchain (e.g., Besu). Used primarily for settlement and proof validation.
- Layer 2 (L2): Our Layer-2 solution, providing increased transaction speed and privacy. This is where the majority of DvP operations occur.
- Smart Contracts: Key smart contracts include:
L1-TMSC: Manages token balances on L1 for settlement purposes. Records bank total balance per token type.L2-TMSC: ERC1155 token contract managing tokens bridged from L1. Records user balances per token type. Used to award tokens after bridging.DvpEscrow: The core smart contract responsible for coordinating DvP transactions, ensuring both delivery and payment occur as intended.
Workflow:
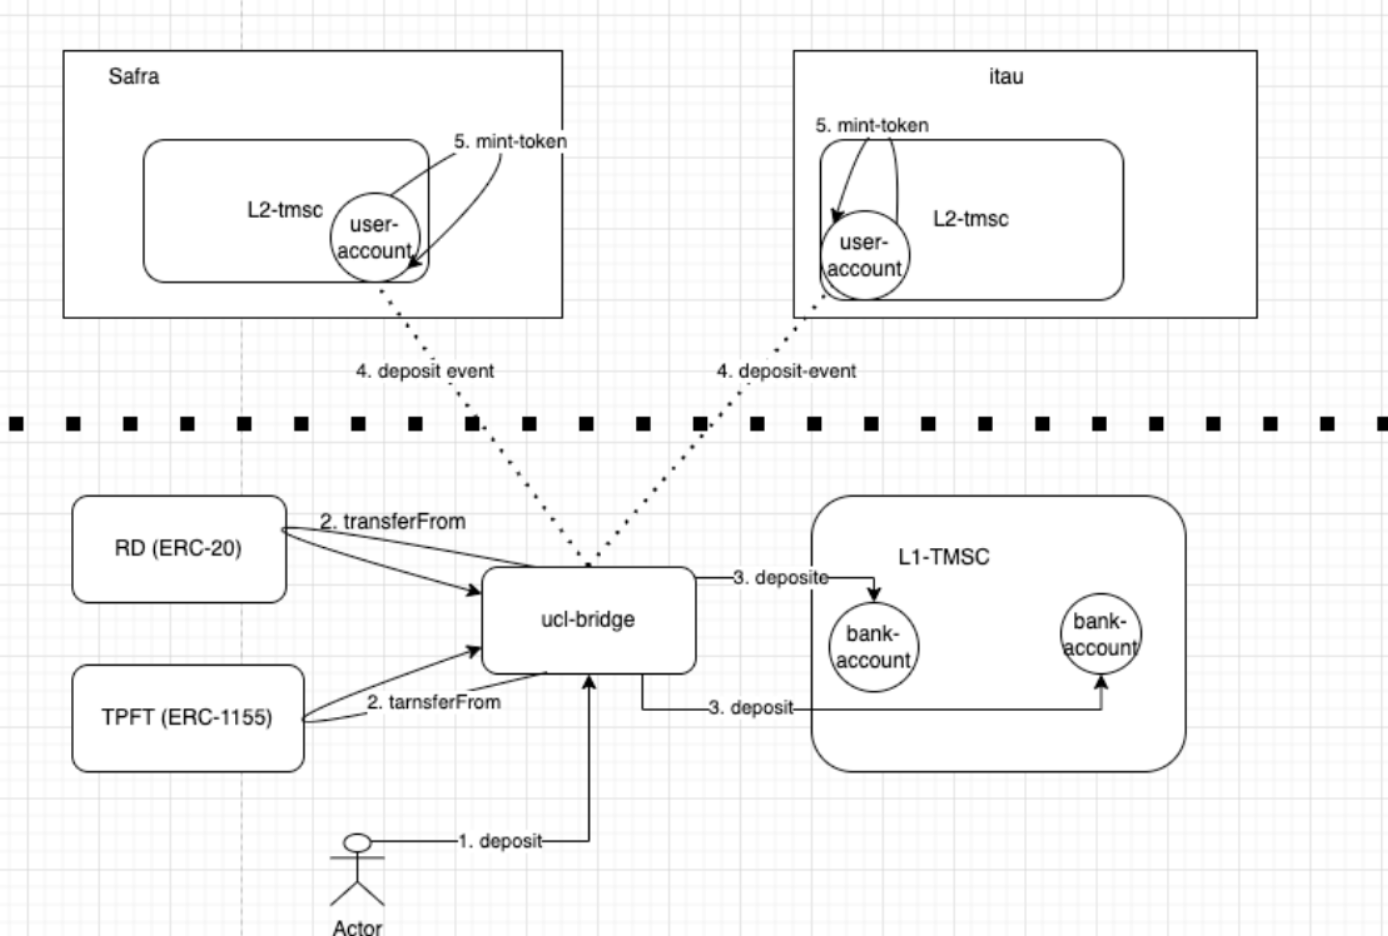
- Bridging: Assets are locked in a bank settlement account on L1 (managed by
L1-TMSC) after bridging. - Token Minting: A corresponding bank node on L2 receives an encrypted event to mint tokens within the
L2-TMSCsmart contract for the specified customer address. - DvP Execution: DvP transactions are orchestrated using the
DvpEscrowsmart contract, ensuring assets are delivered before payment is released. - Settlement: Periodically, settlement occurs on L1 to reconcile balances between banks recorded in
L1-TMSC.
2. Core Concepts: DvP and Hash Generation
The foundation of our solution is the Delivery vs Payment (DvP), which guarantees that an asset delivery occurs before payment is released. This minimizes counterparty risk and ensures trust in cross-bank transactions.
Hash Generation for Bundle & Chunk Hashes:
To ensure data integrity and efficient processing within the DvP workflow, we utilize a hashing mechanism to create chunk and bundle hashes. This code snippet demonstrates how these hashes are generated:
const p = require('poseidon-lite');
const crypto = require("crypto");


async function generateHash() {
	let chunkHash1 = "0x"+ crypto.randomBytes(32).toString("hex");
	let chunkHash2 = "0x" + crypto.randomBytes(32).toString("hex");

	console.log("chunkHash1", chunkHash1)
	console.log("chunkHash2", chunkHash2)

	let hash= p.poseidon3([chunkHash1, chunkHash2, 0]);
	let bundleHash= "0x" + hash.toString(16).padStart(64,"0")

	console.log("bundleHash: ", bundleHash)

	return [chunkHash1, chunkHash2, bundleHash];
}
Explanation:
Poseidon-lite: This library provides a fast and efficient Poseidon hash function.crypto: Node.js's built-in crypto module is used to generate random hexadecimal strings representing the chunk hashes.generateHash(): This function generates three random chunks and combines them using Poseidon to create a bundle hash. The bundle hash serves as a unique identifier for the transaction data.
3. Integrating with DvP
You can integrate with our DVP system through two primary methods:
- Backend Services: Call the
L2-dvp-escrowsmart contract directly from your backend services (e.g., using Java, Go, or JavaScript). - Business Smart Contracts: Integrate DvP functionality within your own business smart contracts.
Example: Scheduling a DvP via Backend Service
const DvpEscrow = await ethers.getContractFactory("DvpEscrow");\
const escrow = await DvpEscrow\.attach(demo\_config.l2\_escrow\_address).connect(safra\_user\_wallet);
let tx = await escrow\.scheduleBurnMintAndGenerate(scheduleRequest);
await waitTxReceipt(tx.hash, bank1RpcUrl);
Estrutura ScheduleRequest2:ScheduleRequest2Structure:
struct BurnRequest {
    address tokenScAddress;
    uint256 tokenType;
    address account;
    uint256 amount;
}

struct MintRequest {
    address tokenScAddress;
    uint256 tokenType;
    address account;
    uint256 amount;
}

struct BurnSettleRequest {
    address tokenScAddress;
    uint256 tokenType;
    address account;
    uint256 amount;
    address toBankAddress;
}

struct ScheduleRequest2 {
    uint256 index;
    uint256 chunkHash;
	uint256 bundleHash;
	uint256 expireTime;

	BurnRequest[] burnRequests;
	MintRequest[] mintRequests;
	BurnSettleRequest[] burnSettleRequests;
}
4. Token Management (L2-TMSC)
The L2-TMSC smart contract manages all tokens bridged from L1. You can interact with it to:
- Mint Tokens: Use the
mint()function to inject tokens into test addresses during POC or testing..
const L2Tmsc = await ethers.getContractFactory("L2TMSC");
const l2Tmsc = await L2Tmsc.attach(demo_config.l2_tmsc_address).connect(safra_admin_wallet);

let tx = await l2Tmsc.mint(user_address, demo_config.l1_erc1155_address, demo_config.loanTpftId, amount);
await waitTxReceipt(tx.hash, bank1Provider.provider)- Access Control: Mint and burn functionality is controlled by access control. By default, it's disabled. Enable it using
l2Tmsc.updateAdmin().
5. Bridging Tokens from L1 to L2
Use the following code to deposit ERC20 tokens from L1 to L2::
const l1Bridge = await hre.ethers.getContractAt("L1Bridge", bridge_address);
const encode =await encryptEvent(bank_user_address,erc20_address,0,amount,rsa_pk)
6. Balance Verification (L1-TMSC)
You can check bank balances using:
l1Tmsc.balanceOfBank(address bank\_settlement, address token\_address, uint256 token\_type